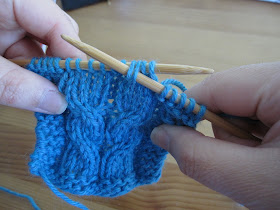
The trick of this technique lies in the basic understanding of what cables are, and just what you are doing to make them look the way they do. Basically, a cable is just a set of stitches that cross over another set of stitches, making a twist. Which stitches are crossed, the frequency with which you cross them, and the types of stitches you're crossing (knit or purl) are all factors that play into the look of the finished cable.
Today, we'll look at a very basic cable that most knitters will run into at some point in their knitting lives: the C4B and the C4F.
 |
| Left: C4F; Right: C4B |
The "4" in "C4B" means that there are four total stitches in this cable, and the "B" means "back", as in "hold two stitches in the back." So, to work this cable with a cable needle, you would slip two stitches onto a cable needle and hold them at the back of the work. Then you would knit the next two stitches on your regular knitting needle, then knit the two stitches being held on the cable needle. The result is a cross that goes from left to right.
The same concept applies to "C4F", except you hold the two stitches on the cable needle to the front, and the resulting cable twists from right to left.
When working a cable without a cable needle, think of each stitch in the cable as a number. For a C4B, you have four stitches, which I'll refer to as Stitches 1, 2, 3 and 4, going from right to left. You will be inserting your needle into Stitches 3 and 4 in the cable. For the C4B, insert the right needle, as if to purl, into Stitches 3 and 4 of the cable, coming from the front of the work.
Then, slide Stitches 1 and 2 off the needle, and hold them with your right thumb and index finger, pinching them so they don't unravel. At the same time, slide Stitches 3 and 4 from the left needle to the right needle.
Grab Stitches 1 and 2 with your left needle. Whew! You don't have to worry about them anymore.
Slide Stitches 3 and 4 back to the left needle.
Then, knit all four stitches of the cable. It is now crossing from left to right, which is what you want a C4B to do.
For a C4F, the concept is the same, but instead of inserting the right needle into Stitches 3 and 4 from the front of the work, you'll be coming from the back:
Slide Stitches 1 and 2 from the needles and pinch them with your right thumb and index finger. Slide Stitches 3 and 4 from the left needle to the right needle.
Grab Stitches 1 and 2 with your left needle.
Slide Stitches 3 and 4 back to the left needle.
Then, knit all four cable stitches. The cable is crossing from right to left.
So, how do you know whether to come from the front to grab Stitches 3 and 4, or from the back? You need to pay attention to what the first two and last two stitches of the cable will be doing. For a C4B, the first two stitches are the ones being crossed over, while Stitches 3 and 4 are crossing over them. You know to come from the front of the work because Stitches 3 and 4 are crossing over the front. For a C4B, the opposite is true: Stitches 1 and 2 are crossing over top of Stitches 3 and 4, so you know to come from the back of the work to grab Stitches 3 and 4.
Things do get a bit more complicated when you add in cables with an odd number of stitches, or cables with both knits and purls. But that's a discussion for another post.
It may feel clunky or weird to try this method at first, but I promise, with a little practice, you'll be flying along in your cabled projects!
Until next time,
Rachel is a Craft Editor by day and a knitting


No comments:
Post a Comment