 |
| Embroidery Hoop Art |
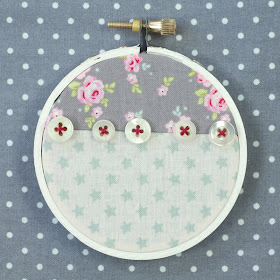
Inexpensive wooden embroidery hoops are great for simple wall art that can be made to coordinate with any decorating scheme; and the affordability of such a project makes it perfect for seasonal use. Follow this decorating trend with a set that highlights a soft winter palette, or create just one for a sweet little accent piece.
The two hoops shown here are part of a five-hoop set shared in our Winter 2013 issue. Grab a copy for the complete tutorial, plus more great projects!
What you need:
- Wooden embroidery hoops, 3-inch and 4-inch
- Fabric scraps (shown are Tilda prints)
- White and red embroidery floss
- Ivory buttons
- Embroidery needle
- Scissors
- White craft paint
- Paintbrush
- Craft glue
- Temporary basting spray (such as Sulky KK2000)
 |
| Appliquéd Flowers Hoop |
Appliquéd Flowers (4-inch Hoop):
1. From background fabric, cut a square measuring about 6 inches.
2. From a floral print fabric, cut out around one floral motif.
3. Spray back of floral motif with temporary basting spray and adhere to center front of background fabric.
4. Use four strands of white floss to sew a large running stitch around inside edge of floral motif.
5. Once motif is sewn to background fabric, rub fingers over edges of motif fabric to curl, fray and distress.
 |
| Horizontal Buttons Hoop |
Horizontal Buttons (3-inch Hoop):
1. From one scrap of fabric, cut a rectangle measuring 5 inches x 2-1⁄2 inches.
2. From a second scrap of fabric, cut a rectangle measuring 5 inches x 3 inches.
3. Sew fabrics together using a 1⁄4-inch seam allowance and press seams open.
4. Place five buttons evenly along seam line so that centers of end buttons are about 2-1⁄2 inches apart. Stitch buttons into place using red floss.
Finishing:
1. Paint outer hoops white and let dry (it is not necessary to paint inner hoops as they will not be seen).
2. Hoop designs so they are aligned vertically with screw top and pull tautly, being careful not to warp designs; screw tightly into place.
3. Trim excess fabric on back to about 1⁄4 inch. Run craft glue around top edge of inner hoops and press down excess fabric. Let dry and display as desired.

Absolutely lovely. We are going to do these at our craft group. Thanks for showing us
ReplyDelete